Showing posts with label House Projects. Show all posts

Monday, July 23, 2012

Master Bedroom Furniture Rearrangement

The Original Layout
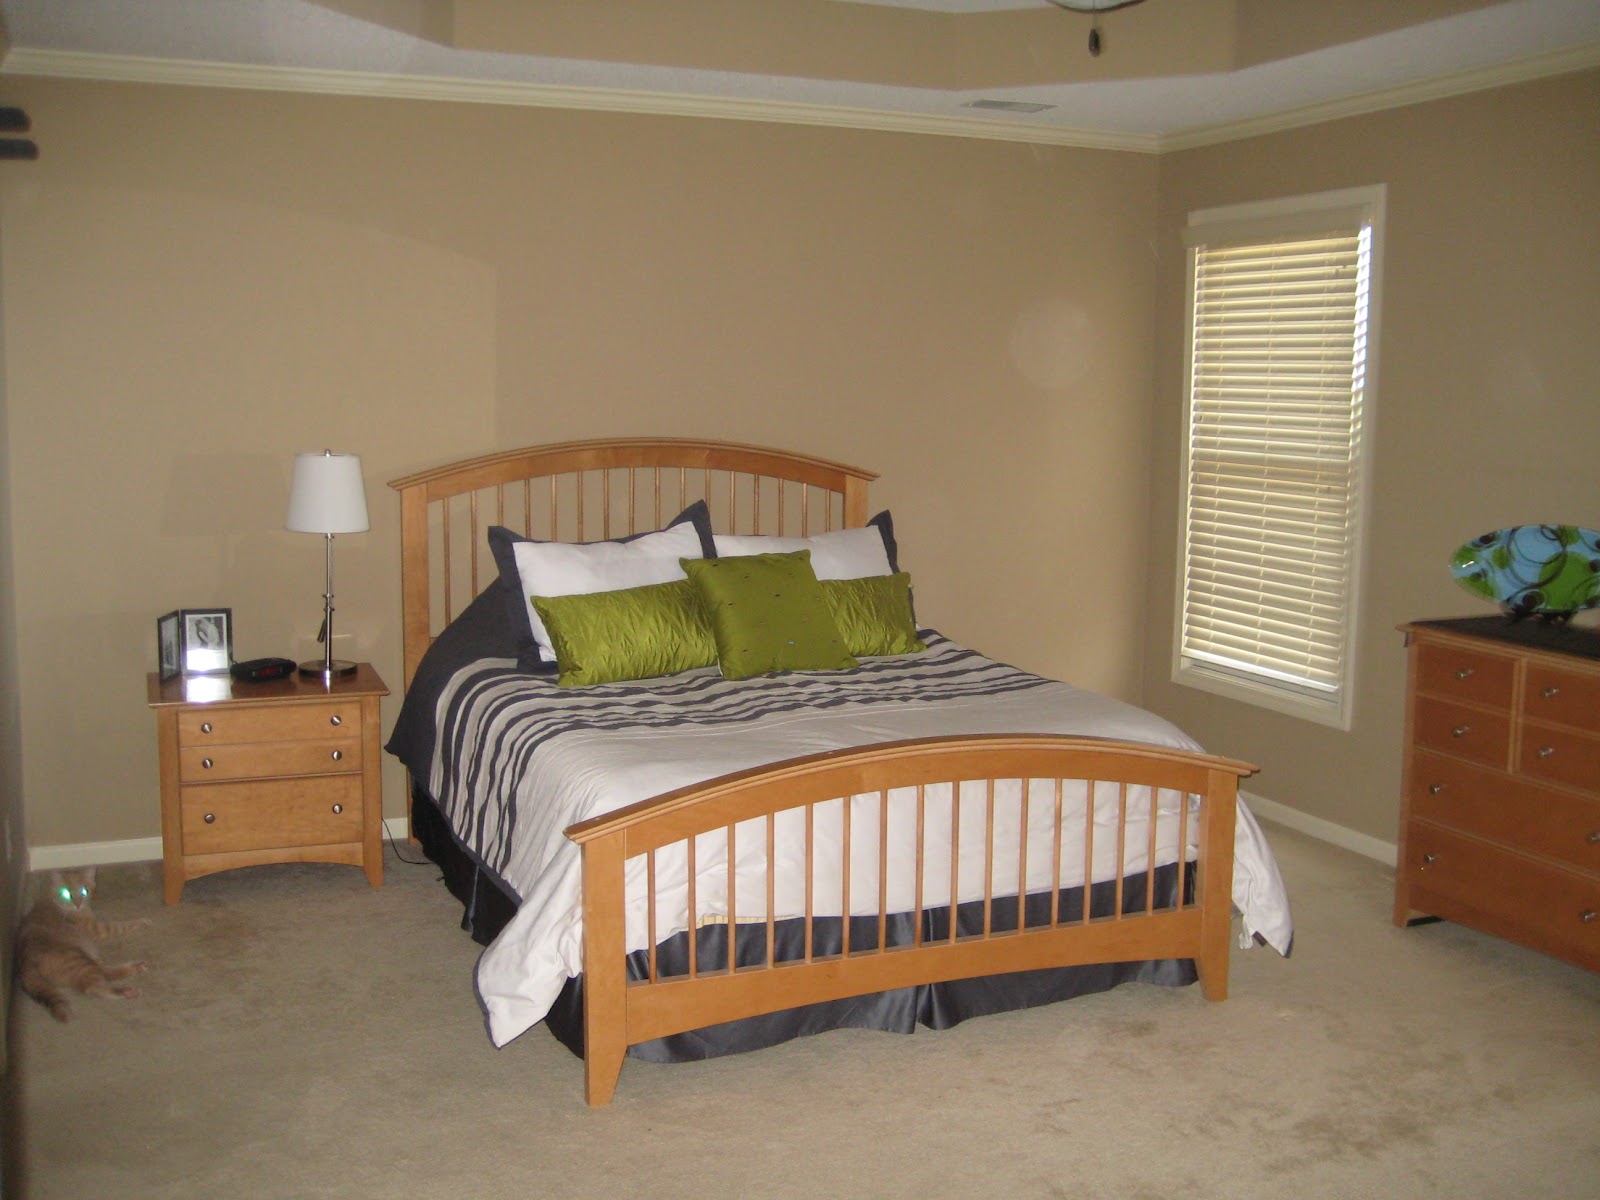
We've been in our house now for a year, so I decided that I wanted to switch up our master bedroom.  Maybe next year I would be so lucky as to get new furniture for our room.  I'm sure most of you recognize this set because it's been around for 15+ years.  I think my parents bought it for me when my family moved into our house when I was in 6th grade, so I've had it for quite a while, gained some scratches, removed the finish in an area, and Abby decided to gnaw on the corner of the footboard while I was at Ash Wednesday mass one evening when she was mad at me for stopping home after work to only let her out and feed her and then leave her by herself again.  Nevertheless, the furniture set has been good to me and nice to have in our room.

When I think of a master bedroom, I think of a quiet, relaxing comfortable space.  I would say our room is far from that at this point.  All I can think of is when we rile up Abby so she bolts out of our room to the stairs, turns around and runs full speed back and jumps on the bed, and repeats that 4 or 5 times.  It's very fun, but I know it will have to stop one day when we get nicer things.

Our room does have potential because it is a decent size.  So as we do with all of our rooms, the picture below shows the original owner's decorations.  I shouldn't have reminded myself of what their room looked like because now our furniture definitely looks like it belongs to a 10 year old girl.
We arranged our room similarly using the long wall as the focal point with the bed centered between the windows, but with the door entering on the long side of the room, it never felt like a true focal point because of the angle, but that may just be because of the finish of the woodwork gets lost in the color of the walls or because we don't have any window treatments or artwork above the bed.  This will all change one day. 
What was also annoying about this layout was that the bed stared into the bathroom that doesn't have a door, so whenever Greg and I would go to bed at different times or when I would wake up earlier, the light blinds the person in the bed.  I tried to get a picture of the situation, but the flash on the camera didn't do it justice, and it doesn't look so bad.  Trust me, it's bad.
The new layout is against the far wall and is truly the focal point of the room.  Again, mostly because you're staring staight at the bed and no thanks to any decorations.  I wasn't sure if I wanted the long dresser in between the windows because it crowds the space a little, but without it that wall would be so bare.  It needs some giant paintings! 
What bothers me most about all of these matching bedsets is that it doesn't come with 2 night stands. I don't like that it's not symmetric on each side of the bed.  So, when we finally decide to buy new furniture for our room, I'm going to break up a set and get some different pieces that still go together.

Enough about reality, let's dream for a bit before I head off to my child-like bedroom.

A picture of a master bedroom that I have always liked is shown below.  I can't decide if I'll move forward with it because it doesn't have a contemporary feel and may be a bit too elegant for me.  And, let's be honest, Greg would never go for the mirrored night stands.  Although, we do want a smaller couch or bench at the end of the bed or a seating area, and we've even thrown around the idea of hardwood floors upstairs at least in the hallways, but maybe in our room, so we can have a fantastic area rug to add lots of personality.

Well, this will have to do until next year when I get into the design phase of the room.

Good night!

Saturday, May 12, 2012

Guest Bedroom Concept

We always offer people to stay the night or for family to come visit for the weekend, but I never really paid attention to what I was offering them... a bed in a room.

I'm embarrassed to even show you what we were offering our guests that stayed overnight.  It was literally a bed in a room.  No extra furniture, no window treatments, no TV...absolutely nothing.

I've always wanted to make the guest room a retreat and relaxing place to stay or even nice, quiet room for Greg or I to read in.  In school in my design classes we were told to have concepts behind all our designs, so I first reviewed a couple rooms that I really liked on the internet to decide what direction that I wanted to go.  I have pictures of those rooms below that I found on HGTV's website under their designer portfolio page for contemporary bedrooms.

I love this headboard, but I think I may steal it for my room one day.  I also like the pop of color with the pillows and accessories against the neutral background.
A few weeks ago, this bedroom was the winner with the bright green walls.  I think I thought about my guests a little more and thought that they may not have the same taste as me, so I should stick to a color for the walls that doesn't have so much energy if I want it to be relaxing.  What I also took away from this room was the black and white pictures against the wall that I always think looks very nice and neat.
This headboard shape is in a lot of rooms and adds a lot with the nail studded border on it, which is a must-have in my next room.
I love the color of this accent wall, and I like the idea of having an accent wall.
 I like the wall color again, the lamp shades, and neutral furniture pieces.
Two nightstands are a must, because I wish our bedroom had two.  I also like the look of lamps on both nightstands.

So, what I took away from all of these rooms was the following:
  • Accent walls
  • Different shaped padded headboard, with nail studded border
  • 2 nightstands and lamps
  • Black and white photos
  • Comfortable pillows
To summarize, the concept for the room is going to be "a traveling retreat".  I'm going to fit in some black and white photos of places that Greg and I have travelled to so far, and I have also thought of an idea to encorporate a map somehow.  I have an idea in my head that I will see if I can pull off and make it look like it fits in the room.

Greg and I did some bargain shopping raiding neighbor's garage sales and we found some pieces to work with.

2 nighstands that I am going to paint and replace the hardware. $15 for both.

2 lamps that I can spray paint and buy new shades. $4 each. 3 drawer dresser that I am going to replace the hardware. $20.
MDF board for $15 at Home Depot and I am going to use Greg's old memory foam to make a padded headboard.
So, I've started the work on the nightstands already.  I need to find some fabric to use on the headboard.  I think I'm going to reuse the bedspread and maybe get a new bedskirt that has some cleaner lines.  We are still undecided on the paint color.  I keep bringing home some blues, but we shall see.

Until next time.... Keep dreaming!

Saturday, April 28, 2012

New Kitchen Table

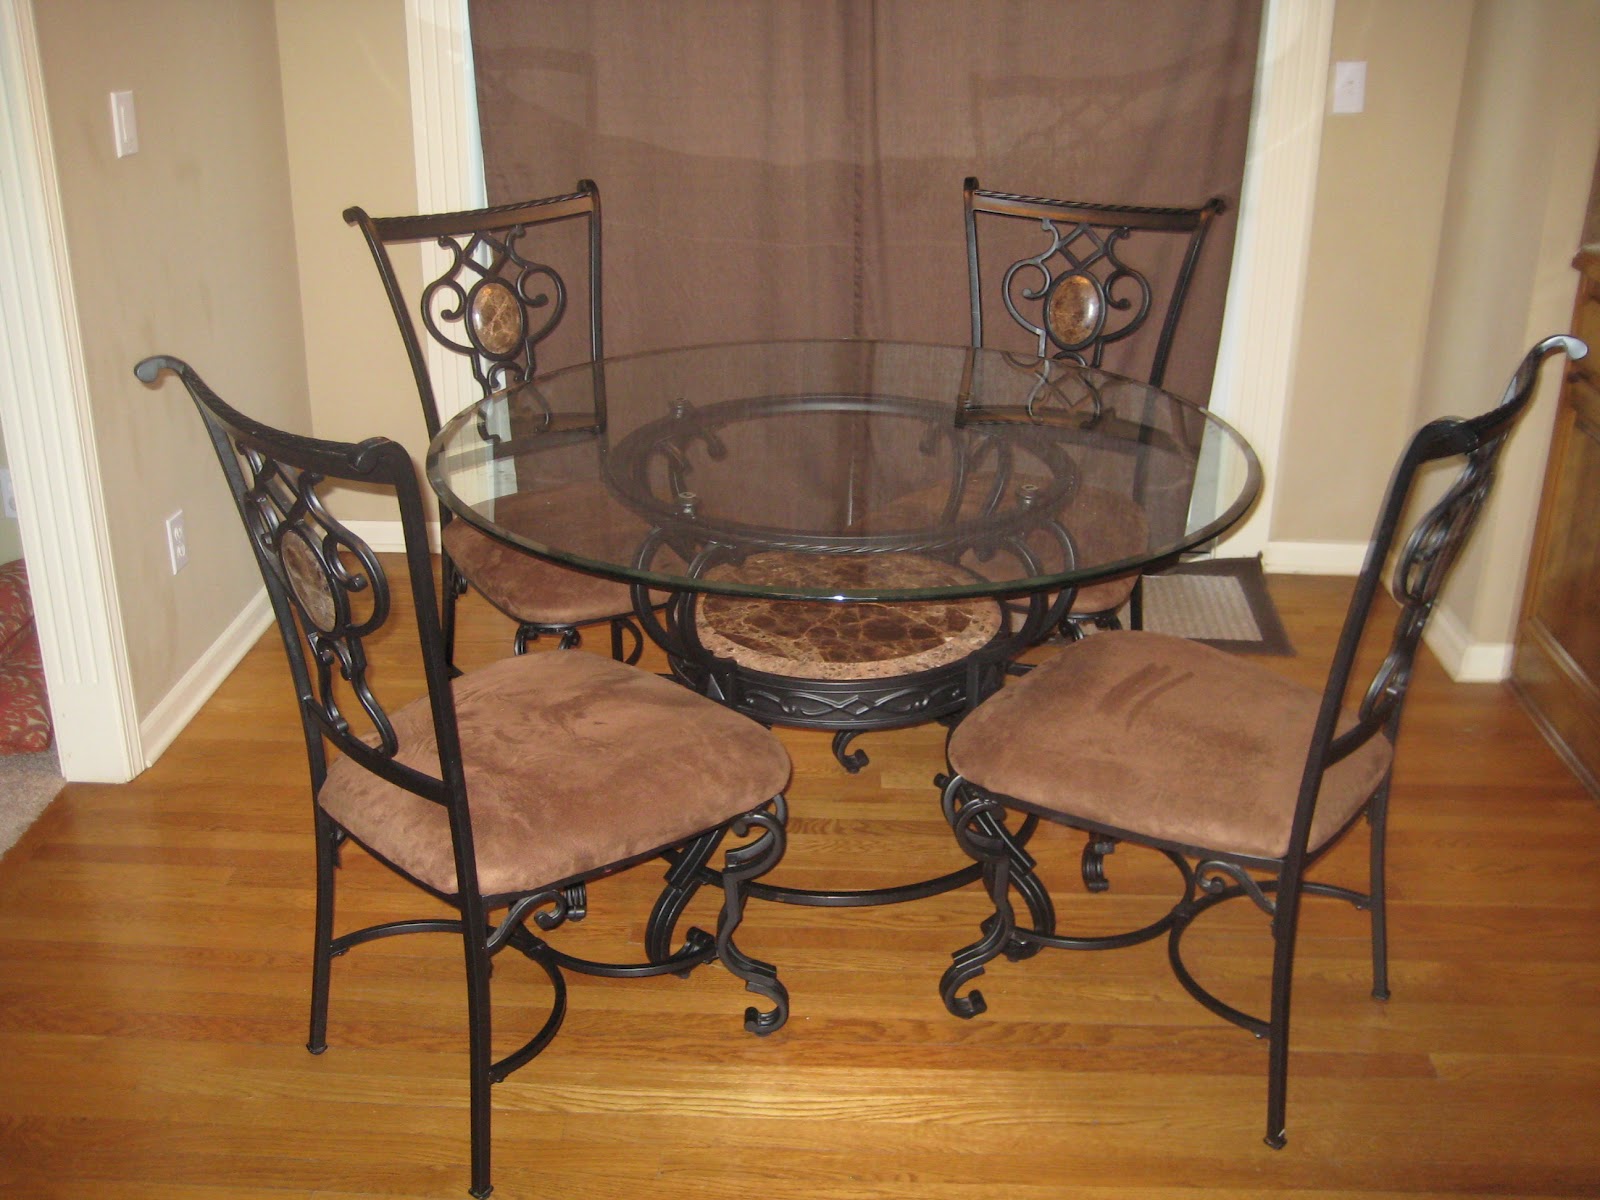
Yes, that's right!  We have a new kitchen table, but maybe I shouldn't call it new.  The previous owner's had a glass table that we liked because it allowed the light to shine through the room.  We were using a small table that Rachael had in her apartment, and it was really small and uncomfortable to sit at when we had friends over.  We found this table on Craigslist, and after driving an hour to take a look at it, I just couldn't say no, although Greg had his reservations.  But like most of our projects, Greg doesn't have the vision that I do of what it will look like at the end.  Greg was checking out the quality of the chairs, and I was trying to imagine how it would look in the room.  The hardware was all different on the chairs and they weren't level.  All things that could be fixed!  This is why we work well together...
Visually, the table looked good from the beginning, but there was still a lot of work to be done.
I've always wanted to recover the seat cushion of a chair because it looks so easy, but let me tell you, it's not that simple...

We picked up the table on our way to Columbia on Saturday, and we arrived back at home around 11 PM.  Immediately, we started disassembling the chairs, and I started wiping them down.  I should have taken some pictures of the dirty paper towels.  They were disgusting!


The chairs had a black fabric cover over the seat, which wasn't done well, but I could see why they recovered the original chair.  Again... DISGUSTING!  We called it a night at 2 AM.  The next morning, we made a list of new hardware to buy at Lowe's, and we were going to stop by JoAnn's to pick up new foam for the cushioning and fabric to recover it in. After getting back from running errands on Saturday, Greg started switching out the hardware, and I tackled taking out all of the staples.  There were so many!
These staples were all from just 1 chair!
There were stains everywhere!
Meanwhile, Chase is jumping over everything, so excited from all the choas in the house.  Anything new that is brought in to our house, Chase is all over it making sure it's okay to stay.  I tried keeping him off all the dirty cushions so he wouldn't catch some sort of disease, but that is what ultimately made him happy, so I couldn't resist.  Please don't report me for animal cruelty. 


Next, we cut the new foam to match the shape of the chairs.  We used the old form as a pattern.  Greg kept telling me to keep Chase off of the foam because he didn't want him to scratch it up since he was running around like a maniac.  Sure enough, we took a break, and Miss Abby found a spot to make herself comfortable.  Chase said it wasn't fair.


We cut the fabric around the seat, placed the foam on top of it, and then Greg stood on top of the wood to weigh down the foam and pulled the fabric around it as I stapled. I thought I would put in less staples, but I don't know if that is possible in order to have a nice look from the front.  We then finished up by stapling in a black fabric to give the bottom a finished look. 


 And here is the final product! So, covering chair cushions was probably the easiest project that we had taking us only 3 days to finish.  It was still a little hard on us (my hands were sore from stapling and Greg's legs hurt from the constant squatting position of weighing down the foam and pulling the fabric).

There is a lot of brown now.  I wanted to eventually change the basksplash above the countertops to add in some color and make it more modern, but everything matches so well now, so that may have to wait for our next house.  I will eventually replace the curtains. 


Tuesday, March 27, 2012

Half Bath Planning

Our half bath is our next project around the house.  I have so many ideas on my mind, and I can't wait until the finished product is completed in order to blog about it, so I will tell you what we have planned and what Greg surprised me with this weekend.

Once again we have a picture of what the original owner's decorations looked like.  The decorations were fine.  It was just that huge soffit that I always had issues with.  It makes the room so dark because the can light is the only light in the room, and it shines straight down, and the soffit just seems out of place floating over the sink.  So, I've always told myself that we are going to do some exploratory work and if there is nothing in the soffit, then it's coming down.
After running errands on Saturday, I came home and was surprised with a lovely mess.  I'm serious in saying that it was lovely because Greg had started the demo process.  The only unfortunate part was that we were having people over that night to BBQ, so I had to clean it up right away.  It was quite the discussion that evening among our friends.

Greg was able to finish the demo Sunday evening and did it with a smile on his face.

Now, we are ready for drywall!  We spent Friday evening at Home Depot buying some supplies.  We are going to have to scrape the ceiling because it's a popcorn ceiling, and we would rather scrape it then have a bad patch job by trying to match the rest.  We looked at new fixtures to choose from, and we both like a modern designed fixture, but we didn't like the price tag.  I went to Lowes on Saturday and found that they were even more expensive, so we think we may decide to buy the one that we both liked.

For our decorations...
We bought some pictures at Home Goods that were a great price that we couldn't pass up, so we are going to use these for color and design inspiration.
We have hung these on the side wall of the bathroom, opposite of the towel bar that has some towels that match the colors.  The other two walls are missing something.  Mackie gave me the idea to maybe paint what would appear to be a wallpaper on these walls, and I thought this could really be fun.  I did some research, and I have run into many other very exciting how-to design blogs that I now check pretty frequently.  On one of them, I found a design that I'm going to try and use.  I was going to paste in the design, but now I'm having trouble pulling it up.  Oh NO! 

Until next time...

Thursday, March 15, 2012

China Cabinet Complete!

It's done!  I think everyone is tired of us talking about refinishing our China cabinet. Well, our 7 month project has come to an end!

My grandparents bought us most of the China for our wedding, so we wanted to display it in a China cabinet.  My friend, Lisa, refinished a China cabinet for her Dining Room, and I always thought it looked really nice, so I thought that we would do the same.  We purchased our China cabinet from Craigslist, and we wanted to refinish it to a more modern look and to match our dining room table. 
My Aunt Patty had refinished her cabinets and built-in shelves in her house with a dark stain that looked fantastic, so we received advice from her to purchase a wood stripper, stripper remover, wood conditioning treatment, a stain, and then a polyurethane.  It was quite a process! 

We thought the wood stripper would easily strip off the original color and finish, but it took several weekends, well let's be honest, several months for us to get off the stain finish and sand it down.  We started off hand sanding, and then borrowed my Dad's hand sander, which helped immensely, and Greg completed the sanding in a couple weekends.

We first started the project in our garage where I volunteered to park outside because we thought we would finish the project in a couple weeks with the nice fall weather.  After a couple months of parking outside and colder weather moving in, I convinced Greg that we move it down to the bathroom in our basement, and that is where he completed the sanding.  Then, it was onto staining.

Staining wasn't all that bad.  It took several coats to get it to a color that we liked and to match our table.  It wasn't the cleanest project for the small basement bathroom.  Stain was splashed on the walls in areas, so look for that bathroom on a future project of ours!  I also found out the hard way that stain penetrates through plastic drop cloths.  Everyone at my work knew this... and somehow I have never heard of it.  We used some CLR to get the stain off the tile, and I found out the next day that this is some pretty powerful mix.  We ended up having a new look on our tile by accidentally taking off the finish in areas.  We are lucky because it actually looks okay.

We finally took an afternoon off work and completed the staining, and Greg did all of the polyurethane.  Greg installed 3 new lights in the top.  My parents bought us new glass shelves and mirrors to install on the back.  Greg's Mom gave me the hammered metal bowl and trays that I placed in the cabinet to illuminate the light.  Once we started organizing the glasses and plates, I realized that the plates are too wide to fit in the middle because of the wood support going down the back, so I have to put the place setting off to one side. 

We're happy with the end result, and the pictures don't do it justice, so you will have to come see it your yourself.  Greg thinks he is ready for the next staining project, but I think I'll wait for a while.