
The last update stopped with rock hung on the walls, and then we quickly got into the finishing process after that.
.JPG)
.JPG)
The knock down finish on the ceiling makes such a difference. That and the added can lights makes the room so much brighter. We brought back the fan that we bought and exchanged it for one without a light kit because the room is so bright already.
We decided that we eventually want taller base throughout our entire house to add to the character of the wood casing around our room openings, so we started with this room. We picked out a base that's 5-1/4" tall from Lowes. It changes the entire look of the room, and we are so happy with it. It's unpainted in all the pictures below, but it will eventually get painted to match all of our existing base, wood blinds and doors. I mentioned in a previous post that we painted the walls in this room a color that Greg picked out as a potential color for the baby room. It's Glidden 38-D8 "Dusty Miller". We thought it was fitting that our last name was in it. :) It's a very calm green-gray color. It's going to look so good once we have everything finished.

.JPG)
 We met with a casework provider and went over some ideas we had for the casework and showed him Greg's original design. Below are the pictures that we printed for our meeting.


 For the countertops, he put the idea of granite in our minds saying that they may have a leftover slab in their boneyard pile that will be large enough for our project. We couldn't say no to that! We went into their showroom and picked out a couple slabs for them to use. We also picked out the hardware for the cabinets to match the pulls on the casework in the picture below. We ordered 20" long pulls for the drawers, 8" tall pulls for the doors on the cabinets, and 6" long pulls for the drawers on the craft table.


 We also have carpet picked out from Lowes. They are having a deal on their Stainmaster carpet right now (through August, I think) with free installation if you order that carpet and a Stainmaster pad. We are getting a little ahead of ourselves, and we are going to have them measure the entire 2nd floor for pricing. After we brought home the samples, they were just so fresh and clean compared to our dull, set-in, stained carpet that we have on our landing upstairs and our bedroom is probably the worst of all of the rooms. They come out on Tuesday to measure, so we'll see how the pricing comes in.
Other than that, it's down to furniture and accessories...my favorite, and yet the most challenging! We'll hold off on that for a little while. We have a double bed to go in the room for now, but we will eventually purchase a smaller foldout couch. Oh, and a TV. You know Greg won't wait on that for long, and I think I saw some good upcoming sales for 4th of July, so we might have one waiting to install in the room.
Well, the next post for this series will be the finished room! Can't wait!
The knock down finish on the ceiling makes such a difference. That and the added can lights makes the room so much brighter. We brought back the fan that we bought and exchanged it for one without a light kit because the room is so bright already.
We decided that we eventually want taller base throughout our entire house to add to the character of the wood casing around our room openings, so we started with this room. We picked out a base that's 5-1/4" tall from Lowes. It changes the entire look of the room, and we are so happy with it. It's unpainted in all the pictures below, but it will eventually get painted to match all of our existing base, wood blinds and doors. I mentioned in a previous post that we painted the walls in this room a color that Greg picked out as a potential color for the baby room. It's Glidden 38-D8 "Dusty Miller". We thought it was fitting that our last name was in it. :) It's a very calm green-gray color. It's going to look so good once we have everything finished.
This picture is similar to Greg's original design, but we liked how only the TV protruded into the room, so we could still maximize the space in the room since we're already losing some because of the slant of the ceiling.
These 2 pictures show the type of casework that we like, which is referred to as the "craftsman" style. It has the simplicity of the square border around the edges. The gentleman with the casework company suggested that we still install a small piece of quarter-round on the inside edge because this style didn't go with the design of our doors in our house. It was nice to have the suggestion, and we saw an example in his showroom with the quarter-round piece, and it's very subtle, but a nice touch to pull it all together.
Then, there's our beloved craft/computer table, which is the whole inspiration of the room, really. We were going to build this ourselves, but I just couldn't resist the help and the idea of just having it all done. Without this table, the function of the room would be lost, so we threw it in our order.
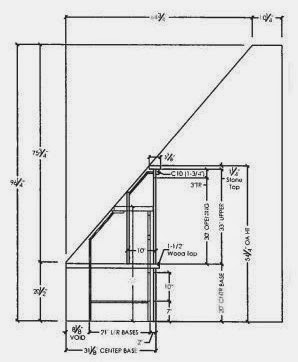
He left our house and a few days later, we had some shop drawings to review. At first there were 6 drawers next to the TV because of the concerns with weight of the items placed in the drawers. They were just so small, so we had them change it back to 3 drawers, and we changed the drawer glides to help better support the weight. The first round of shop drawings also had the height of the casework stopping at 30" with a full depth of 24" for all drawers and shelves. It was just so short causing the drawers to be shallow, so we had them raise up the height to 40" and make the top drawer less deep. This will also make the countertop only be around 14" deep.
Other than that, it's down to furniture and accessories...my favorite, and yet the most challenging! We'll hold off on that for a little while. We have a double bed to go in the room for now, but we will eventually purchase a smaller foldout couch. Oh, and a TV. You know Greg won't wait on that for long, and I think I saw some good upcoming sales for 4th of July, so we might have one waiting to install in the room.
Well, the next post for this series will be the finished room! Can't wait!


.JPG)
.JPG)
.JPG)
.JPG)
.JPG)
.JPG)
.JPG)
.JPG)
.JPG)
.JPG)
.JPG)


.JPG)
