I bought my 7" tablet last year, and was given a bluetooth keyboard at Christmas. I love the tablet because it is so mobile and fits in my purse, but I found myself not lugging the keyboard around so much because it didn't have a case. There are a lot of good blogs for DIY cases, but most of them didn't have keyboards incorporated into the design, so I had to change up the pattern a bit to fit my situation.
The best blog that I found for a DIY tablet case was Practically Functional because the construction of the case was so easy because she used glue. I have a new respect for glue and the different types you can buy for the purpose that you are using if for.
So, to begin, you will need the following:
- A binder or two depending on the size of your tablet and keyboard
- Fabric of your choice
- Felt
- 1/4" Elastic
- Mod Podge Glue
- Fabric Glue - I purchased Beacon Fabri-Tac
- 1 Piece of Cardstock Paper
- Foam Brush
- Tools: Scissors, Exacto Knife, Ruler, etc.
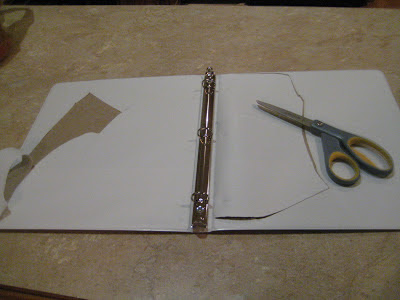
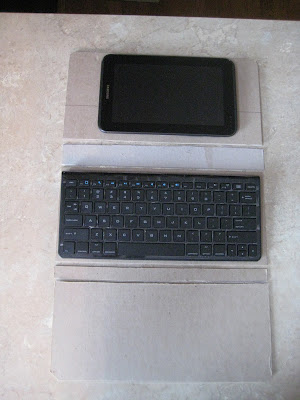
Begin by measuring out your tablet and/or keyboard. You will want approximately 3/4" extra on each side and 1/2" on the top and bottom. For the sides/folds of the case, you will want around 3/4" - 1" thickness depending on the thickness of your tablet and if you are including the keyboard. Make sure you stack them all up as if they were in the folded up position to get this thickness. You do not want to be short. Use the exacto knife to cut the cardboard.
I copied off of the case that I had purchased for my tablet where the tablet supported itself on its back. In order to do this, you will cut one full size piece for the front with the space around it as mentioned above. Then, for the other piece that will sit directly behind that, you will use the same size, but cut it lengthwise at 1/3" of the width. So, you will have two pieces - 1 at 1/3 of the width, and 1 at 2/3's of the width.
Next, decide how you want the outside of your case to look. This is the best part because it can be totally custom to your style! I chose 3 different fabrics for mine. I love the quartered fabrics at JoAnn's because they only cost around $1 and you have a lot to choose from. Since, I'm a bit of a perfectionist, I actually sewed this together with a sewing machine, but you can just use glue. Most importantly, iron the fabric before applying it.
I also added a layer of felt in between the fabric and the cardboard for the outside of the case. I like the padded look.
So, layout all the cardboard pieces for the cover. Keep the full piece that your tablet will go in separate, and just use the other 2 pieces at the 1/3 and 2/3's lengths now for the back of the cover. You will want approximately 1/8" between the pieces of carboard for the bends. Cut your felt down so it is around 1/4" longer on all sides, and cut the fabric down so it is around 1/2" longer on all sides. Apply the Mod Podge to the cardboard on the back side and place it on the felt. Make sure you maintain your 1/8" between the pieces when applying it to the fabric.Next, turn it over and apply the Mod Podge on the inside 1/2" perimeter and pull the fabric around the cover to seal it to the insides. It doesn't matter how this looks because it gets covered up. The rounded corners can it somewhat difficult, so you may have to cut away some of the felt, and this is where I found the Mod Podge didn't work so well, so I bought an actual fabric glue. Mod Podge was only useful when gluing the fabric directly to the cardboard, not fabric to fabric. So, you may have to use the Beacon Fabri-Tac glue at the corners to glue down the fabric.
 Now, we will make the straps that will support your tablet. Cut the cardstock paper down to the size of your tablet. Cut (4) pieces of the elastic around 4" - 5" long. Place your tablet face down and place the cardstock paper on the back. Wrap the elastic around a corner of the tablet and pull it back so it is taught, but not stretched. Glue down the elastic straps to the cardstock with the fabric glue. Repeat the same step on the opposite corner, and then move to the other corners.
Turn the piece of cardstock over and glue it to the center of the full piece of cardboard for the tablet. I used Mod Podge on the cardstock and the fabric glue at the elastic strips to make sure it was glued to the cardboard really well.
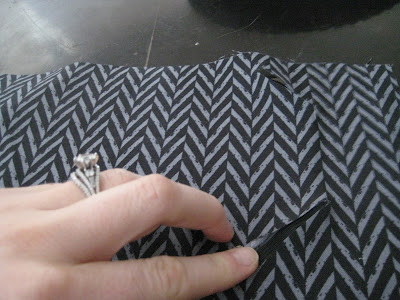
Next, decide what fabric you would like for this piece and cut it so it is 1/2" longer on all sides than the carboard. Start on one side by applying the Mod Podge to the face of the cardboard and then stop once it reaches the elastic. Place the fabric on the over the part that has the Mod Podge on it, and then use the exacto knife to cut the fabric diagonally where the elastic strips are so they can go through. Use the Mod Podge again to glue around the strips and over to the next set of strips, then cut the fabric again for the elastic to go through, and then finish gluing down the fabric. Turn over the cardboard, and glue the pieces to the back, and then this piece is finished.
Almost finished... Next, cut a piece of elastic around the width of the tablet and leave a couple inches on each side. About 1-1/2" down from the top, glue the elastic on one side with the fabric glue, wrap the elastic around the front, pull it taught, and glue it on the other side 1-1/2" down from the top. Next, choose the fabric for the inside, and cut it so it is 1/4" wider than the entire length minus the top piece of cardboard that the tablet piece will be glued to. The edges of the fabric will be turned under in order to give it a finished look. I sewed a hem around the entire perimeter to make it a little easier. Apply Mod Podge to the carboard up unto 1" from the perimeter and glue down the fabic. If you don't have a sewing machine, then start in one corner by folding the fabric under itself to create that finished look and glue it down with the fabric glue, and work around the entire perimeter in the same way. If you did sew the fabric, then simply place it over the Mod Podge and glue it with the fabric glue at the edges. Repeat the same step for the backside of the tablet cardboard piece, but it only needs to go up to the portion of it that will get glued to the small piece on the entire case.
Once that is completed, then the top of the tablet piece to the 1/3" length of the tablet piece that was not covered in fabric. I used the fabric glue for this. Place a heavy object over this part and let it sit for a few hours. My case wanted to warp a bit with the glue on it, so the heavy object helped.
After it has dried for a few hours, then it is ready to use! Insert your tablet and enjoy! I really liked this project and overall it turned out pretty well. My only advice is to measure, measure, measure. My case turned out a little snug, but I increased the spacing of the cardboard pieces by 1/16" of an inch in this turtorial in order to help with that.
The basis of design of this case can be used for a lot of items even if you don't have a tablet. It would make a nice book cover, camera case, etc.


